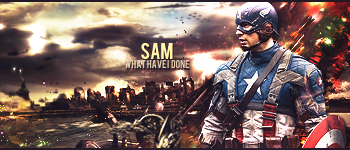
In This Tutorial It Will Show You How I Make Signatures In My Style And Way
1. Go to File > New > Preset - Custom/ 400x150 / Background Contents - Transparent
Posted Image
2. Press Ctrl+O To Open Your Render
3. Drag Your Render To Your 400x150 Document And Press Ctrl+T To Re-size It (Try To Keep It As Big As The Document) Then Position It Wherever The Render Is Looking Or Where You Feel It Looks Good. < If Your Render Has A Mark On It For Ex: The Person Who Rendered It Left A Emblem Use A Rectangular Marquee Tool Over The Emblem And Press Ctrl+X
4. Now For Your Background Click The First Layer And Use The Gradient Tool And Set It To Radial Gradient Then Select Your Colors (Use The Eyedropper Tool To Use The Color Used In Your Render There For It Blends With The Background Then Use The Gradient Too And Start From Your Render Out So It Gives A Glowy/Lined Effect Around Your Render
5. Now Select Your Render And Duplicate It 5x (Ctrl+J To Duplicate) Then Click Your Original Render #2 > Use The Smudge Tool (X Smudge Tool Is What I Use And At The End I Will Show You How To Make It) Then Set The Strength To Your Smudge Tool To 50% Gently Smudge Outwards Then Leave It As Normal. Also Go to Filters Sharpen>Sharpen
6. Use Your #3 Layer And This Time Go Haywire With Your Smudge Tool Around Your Render. Set It To Color Dodge Afterwards.
7. Use Your #4th Layer This Time Smudge It Again For Gently Around Your Render And Then Set It To Color Dodge Then To A 50% Opacity.
8. Use Your #5 Layer Re-size It To A Bigger Picture And Move It Opposite To Your Renders Position And Smudge It A Bit But Not Too Much So You Can Use It As A Addition To Your Background. Then Go To Filter>Brush Strokes> Spatter And Set Them To 10 Which Ever You Prefer To Use. Then Apply It To 20-40% Opacity.
9. Then On Your #6 Layer Re-size It A Bit Bigger Than Your Render Put It On Soft Light And Gently Smudge It Around It With Your Smudging Tool. Use The Eraser To Give Your Render So Touches So Its Not To Rowdy.
10. Use Your #7th Layer This Time Use A Soft Brush Make It A Small Size So You Can Accurately Smudge Around Your Render (Set Strength To 50-75%). This Will Give A Nice Flare Effect. I Advise You To Smudge More On One Side Than The Other So The Render Has More Detailing Touch. Then Set This Layer To Color Dodge
11. Then For Your Last Layer Use The X Brush Again And Gently Smudge Around Your Render. Try To Blend It In.
12. Then On Your Last Layer Again Go To The Bottom Right Corner Of Your Program Under Your Layers And Click The Black And White Circle Icon And Set It To Black And White Press Ok (You Can Change The Settings If You Like Your Choice). Then Set The Opacity To Around 15-20%.
13. Almost Done With The Signature Tutorial. Then Click The Black And White Icon Again And This Time You Would Need To Set It To Photo Filter. Use The Eyedropper Tool To Find The Color Of Your Render And Adjust It To What Your Comfortable With. Set The Opacity To That Layer To 30-40%
14. Finally You Can Border Line Your Signature And Fill it With Any Color As Long As It Matches Your Render.
15. Now Let's Put Some Text On The Signature.
Get The Type Tool (Press "T" On The Keyboard), Choose A Font You Prefer, And Type Your Name On The Signature With A Color Of Your Render Again.
Your Signature Is Pretty Much Finished Now If You Want You Can Tweak It And Make It To Your Comfort.
X Smudge Brushes. Make A New Document, Around 100x100, And Type One Huge X In A Nice Font. Then, Click Edit - Define Brush Preset and Click OK. Then, Mess Around With The Brush Settings To Make It Scattered And Faded.
Results 1 to 1 of 1
Thread: [Xoom's] GunZ Tutorial
Hybrid View
- 14 Nov. 2010 10:29pm #1
 [Xoom's] GunZ Tutorial
 Last edited by Sam; 14 Nov. 2010 at 10:37pm.

I Don't Bite!


 LinkBack URL
 About LinkBacks

 Reply With Quote