[QUOTE=Raivu;371293]
UNDERSTANDING BPM
***THE TWO ABOVE WONT MIX UNLESS THEY'RE THE SAME BPM***
I'd have to say BPM is THE most important thing when DJing.
It's what makes your transitions smooth, so you're not "Trainwrecking" (Playing two songs at the same time that sound like trains colliding)
You should Notice that 70 is the same as 140, because 7 + 7 = 14. So those will mix. If it's 5 over or under, it won't. You can hear the difference, play around with it a little, you'll get it.----a. 70.00 = 140.00 (will mix)
----b. 60.00 = 120.00 (will mix)
----c. 80.00 = 160.00 (will mix)
----d. 70.00 = 150.00 (will NOT mix)
METHODS TO THINK ABOUT WHEN SYNCING DIFFERENT BPMS
There are Great methods available for syncing different BPMs.
Let's say you want to go from Dubstep (70/140) to D&B (87/174)
How we'd do this is
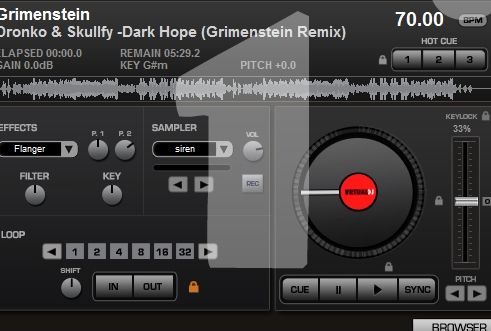
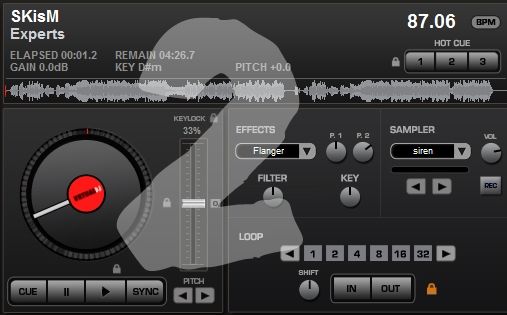
I've provided an example of how Changing BPMs can be useful in my new D&B mix.1. s-l-o-w-l-y (to a point where it's not noticeable) bring your Key slider down (this raises the tempo) until it meets the BPM in track B (or as close as you can get to it)
If you do it slowly enough, you won't even notice the change in tempo yourself, and it keeps your crowd going too.
2. play Track B when you're ready to drop it in.
3. pick and find points in Track A to bring your levels (his/mids/lows) down and drop the volume.
When this mix starts, it starts at 80.00bpm, then moves up to 87.5 (175) There are a few points where it comes up to 100 and drops to 70.
Notice you wont' be able to really tell the difference. But you CAN tell where the next song comes in.
[SC]https://soundcloud.com/grimensteinofficial/interplanetary-insanitarium[/SC]
KEEP IT GOING
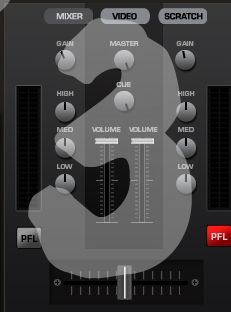
This is your Mixer with all of your Levels (Hi/Mid/Low) in their Default Positions
(Don't Stress, I'll explain the Mixer in a minute)
Remember, The point to mixing is all about the "Flow". You want it all to sound like the same song, just going on Forever and Ever and Ever.
Or, well, until your time is up or you get tired of it.
The first thing you do after you take a track out, is to load the next one in, and re-adjust your levels to their default positions.
EXAMPLE: If you lowered the Lo's and Hi's and dropped the volume to take out Song B, then go ahead and bring them back to their standard positions, and turn the volume back up after you've loaded the next track.
Another helpful tool is the "Sync" button.
Now I"ll warn you, Starting as a DJ, if anyone knows you're using the Sync button, it's almost guaranteed you're going to get laughed at or called a "fake dj" or a "dj hero"
Don't listen to this.
If you're starting, it's perfect to learn, and notice the differences, and it also helps you with your transitions. I do advice, however, that you use the Sync button as a last resort and do your best, if possible, to manually change your Tempo.
The Best use of the Sync button I find, is to line your tracks up.
If you have them both playing at the same time, and you start to "trainwreck" it'll sound awful. Just one touch of that Sync button will get your waveforms aligned and ready to go.
Let's talk about those for a minute.
WAVEFORMS
Here's what we see now.
This is how you can [visually] see your Transition, which works wonders for getting started.Blue = Deck A
Red = Deck B
Divider in the Middle
Larger/Smaller rectangles under the waveform
When you play "Deck A" you'll see the Blue waveform move.
It's split into 1/4 beats (metronome) by your BPM.
This means that having the same BPM on both tracks will have the same distance between Large/Small Rectangles.
To get Deck B ready, make sure it's
The larger Rectangles (are in sets of 1/4) are the most important, because that indicates start/finish beats.1. Going to be the same BPM as Deck A when you start
2. Lined up properly.
Normally, the start of a Kick, or a Drop will be lined up perfectly with the Larger Rectangle beneath it in the Waveform.
Sometimes, however, this isn't the case.
So we do one of two things to Line it up.
This assures that when you start the next track, you'll already be lined up and ready to go, instead of starting it all awkwardly.1. Line up the beginning of the Rectangle with the Center Divider
2. Line up the beginning of the Kick/Drop with the Center Divider (only if the rectangle isn't placed under the kick)
Again, practice this by playing Deck A, Then transitioning into Deck B.
This is where we look at our mixer.
MIXER
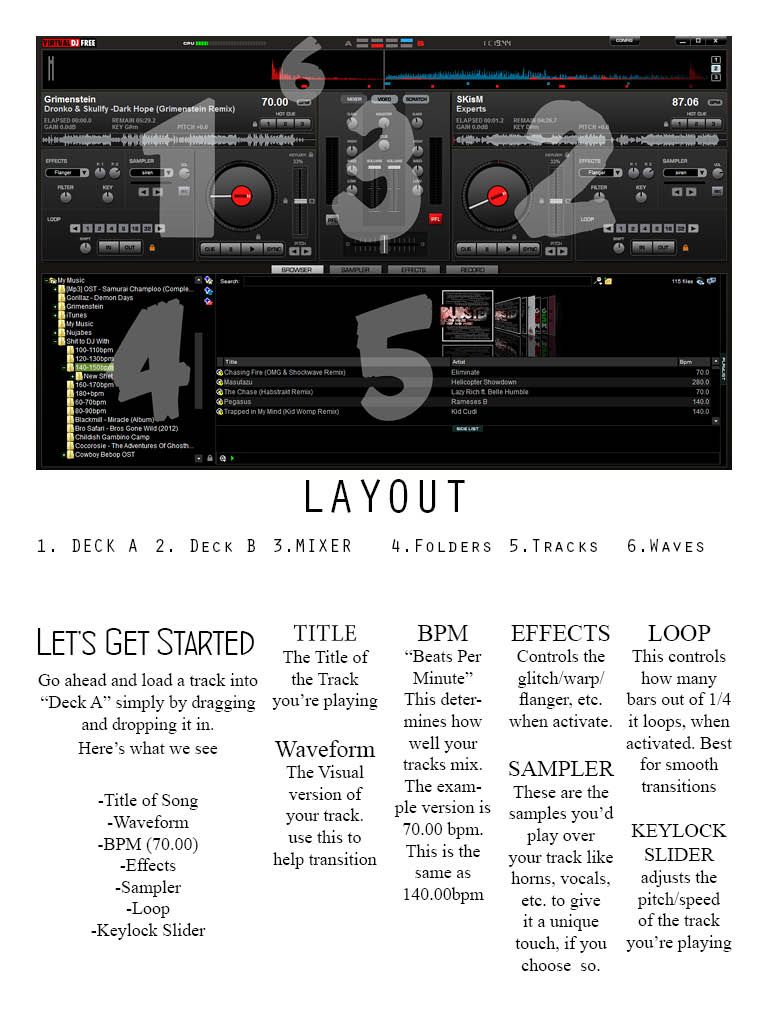
What we see (The ones on the left are for Deck A, the ones on the left are for Deck B)
There's all the Technical Shit out of the way.-Hi knob (Vocals, Hi Hats, Horns, Percussions, Anything with a higher pitch in that song)
-Mid knob (The overall Hi/Low pitches in the song)
-Low knob (Bass, Kicks, Drums, anything with a low boomy pitch in the song)
-Volume Slider (Verticle. This adjusts the volume of the song on that deck)
-Deck Slider (Horizontal. This adjusts which song you hear the most of)
Now let's get started.
LETS BEGIN
1. Play Track A
2. Line up Waveform for Track B using the Big/Small Rectangles, and center divider as a Guide [Diagram 6]
3. Make sure the Levels in the Mixer are at their Default positions
4. Use some Effects to keep things interesting, If you choose to do so (not necessary)
5. As the song Plays, make sure your BPMs are the same.
--a. Either "Sync" deck B, or..
--b. Slowly adjust the keylock slider manually
6. When you reach a point to drop Track B in, Do so. Remember, use the Rectangles and Center Divider as Guidelines.
---(watch Deck A to see where to start Deck B)
7. Now that you have both tracks playing, Adjust the Hi's and Lows on Deck A accordingly (Adjust them Slowly)
8. When you're ready for Deck A to end, Drop/Slide down the Volume Slider on Deck A
9. Pick a New song for Deck A and get it ready
10. Repeat
You'll figure out your own styles and ways of doing things along the way, and Always Remember, the Crowd will get as Hyped as you do, so keep it exciting, interesting, and wild. Unless you want a Boring ass crowd.
In the next tutorial, I'll go over the Effects, Samples, and other styles of Mixing.
Stay Gold, Alchemist
-Raivu
(Grimenstein)
SOUNDCLOUD: GRIMENSTEINS SOUNDCLOUD
FACEBOOK: http://www.facebook.com/grimenteinofficial
WEBSITE: GRIMENSTEIN
DOWNLOAD VIRTUAL DJ: http://www.virtualdj.com/download/free.html
Results 1 to 7 of 7
- 30 Jan. 2013 06:02pm #1Stunning

- Age
- 34
- Join Date
- Nov. 2009
- Location
- Everywhere. I have the internet
- Posts
- 4,099
- Reputation
- 440
- LCash
- 0.25
 Intro to Audible Alchemy [Tutorial #1] (OPEN)
 Last edited by Raivu; 01 Feb. 2013 at 03:40pm.
☜(* x *)☞FOOL ON COOL GENERATION
 Originally Posted by C0FF1NCASE
- 01 Feb. 2013 03:40pm #2Stunning

- Age
- 34
- Join Date
- Nov. 2009
- Location
- Everywhere. I have the internet
- Posts
- 4,099
- Reputation
- 440
- LCash
- 0.49

Thread is now Open
I hope you all find it useful☜(* x *)☞FOOL ON COOL GENERATION
 Originally Posted by C0FF1NCASE
- 01 Feb. 2013 05:50pm #3

This is really awesome, thank you Mr. Raivu!
- 01 Feb. 2013 05:51pm #4Banned Epic

- Join Date
- Apr. 2010
- Location
- When freedom is outlawed only outlaws will be free
- Posts
- 5,113
- Reputation
- 195
- LCash
- 0.83

Wow, like he said, this is actually really sick. Hopefully you can post more stuff like this soon, I really like it.
- 01 Feb. 2013 08:26pm #5Administrator

Global Moderator Literally Hitler
Morbidly Obese
Bird Jesus
- Age
- 35
- Join Date
- Nov. 2009
- Location
- The Land Of Ooo
- Posts
- 8,569
- Reputation
- 711
- LCash
- 0.30
- 03 Feb. 2013 03:10am #6

Whoa, that looks cool

Does it also double as a digital audi rkshop too?
- 03 Feb. 2013 03:19am #7Stunning

- Age
- 34
- Join Date
- Nov. 2009
- Location
- Everywhere. I have the internet
- Posts
- 4,099
- Reputation
- 440
- LCash
- 1.59
 ☜(* x *)☞FOOL ON COOL GENERATION
 Originally Posted by C0FF1NCASE


 LinkBack URL
 About LinkBacks



 Reply With Quote


