

 LinkBack URL
 About LinkBacks
This is mainly for beginner-grade DSLR's, but can be translated into the professional models as well. I do recommend you learning on something cheap first. That way you will learn to take the best shots you possibly can without having to rely on extra features. Once you figure out what type of photography you wish to do, you can upgrade to fit your needs. I will create a guide for picking out the right DSLR for you later.
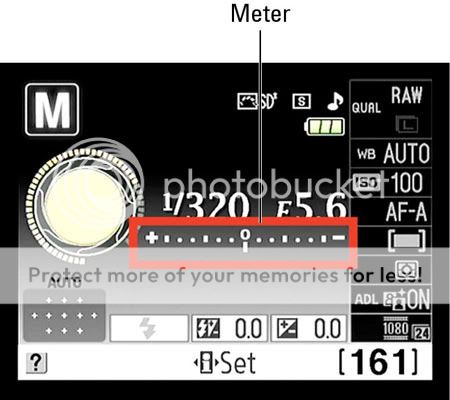
Here is an exposure meter. See the big dot in the middle?
Notice the...
+. . . . . 0 . . . . . .-
The "0" is the center, proper exposed point on the exposure meter. When the "l" is under the "0" it means it is properly exposed. I call it the "happy place". To do this, spin the command dial till it is at the correct setting. By doing this you are changing your shutter speed. Shutter speed is how fast the camera takes the photo. The higher the shutter speed (in the above diagram - 1/320) the faster it will shoot, but it will also make images more darker, or lighter. You just need to watch the exposure meter while spinning the dial.
ISO (seen as ISO 100 in the first diagram) directly effects how sensitive your sensor is to light. It also allows you to get faster shots. The higher the ISO, the faster the shutter speed. The higher the ISO number means the more light that is let in. However the higher you raise your ISO setting, the more noise there may be on your images. Try and keep your ISO as low as possible. Noise in digital photos is caused by heat in the sensor. Astrophotographers that use long exposures often cool the sensor up to -20°C with a Peltier unit, just to avoid noise. (That is more technical than a beginner needs to know though.)
The aperture will control the depth of field and exposure. The aperture setting (f-number - as seen as F 5.6 in the first diagram) can make the aperture more narrow, or more wide. The widest aperture setting being the lowest f-number your camera will go, and the narrowest aperture setting being the highest number your aperture will go. This next diagram will show you how to control your aperture. Wide apertures allow more light to enter the sensor while narrow apertures keep light from coming in. The lower the aperture the more depth of field (blurry background) you will have.
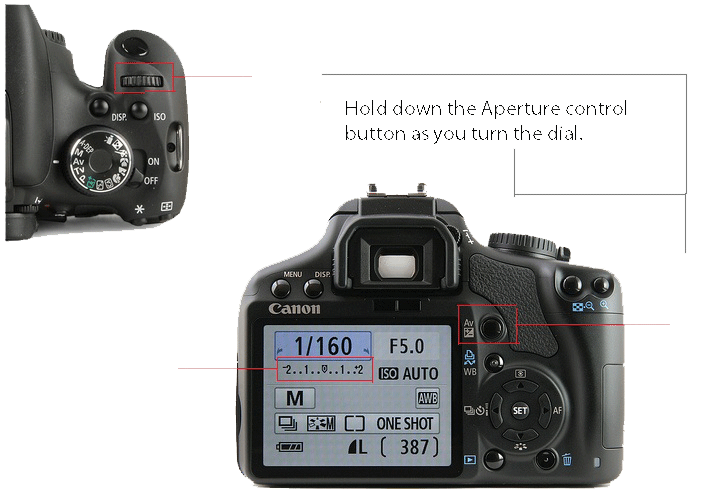
For Canon users (such as myself), what is written above is essentially the same thing for Canon. Here is your diagram.
Results 1 to 7 of 7
Threaded View
- 02 Apr. 2013 06:42am #1Fancy-Shmancy


- Age
- 30
- Join Date
- Mar. 2011
- Location
- Kentucky.
- Posts
- 490
- Reputation
- 23
- LCash
- 0.25
- Awards


 Proper Exposure In Manual With a DSLR - Detailed Guide
 Last edited by SpornyTheAlien; 02 Apr. 2013 at 06:49am.


 Reply With Quote